Build a job board in Zapier
Deep dive into creating a job board in Zapier. Learn how to combine Interfaces, Tables, Zaps and AI to create a job board that captures emails from job-seekers, allows companies to post jobs, and more.
Today I’m going to teach you how to make a job board in Zapier so that you can
make one billion dollars in passive income.
Maybe.
You’ll at the very least be able to sell job postings to companies and get
job-seeker subscribers. Don’t despise small beginnings.
Choose a niche job market, curate some jobs yourself, and go!
Honestly, this is the perfect Zapier app to learn how to combine Interfaces,
Tables, Zaps and some AI. There’s a healthy combination of all four with the
possibility to extend further.
It’s also a deep-dive look into Interface’s superheroes named “Params.”
More on them later.
Let’s Fly!
Build the Interfaces
You’ll need four pages:
- Job Board — your homepage
- Post a Job — for companies to submit a job
- Preview — for companies to preview their job posting before purchasing
- Job — for job-seekers to view each job
Job Board
This is your bat cave. Zapier makes it easy to decorate with simple components
like text and links. They stack on top of each other pretty easily.

Create a title, add a link for companies to “Post a Job” and point it to the
“Post a Job” page.
Then, create a simple form that captures email addresses from job-seekers.
This is how they’ll subscribe.
When you create a form, you can automatically create an associated table to
store the information right from the Interface. You’re also able to create a
Zap to send these subscribers into something like Mailchimp.
There will be a table at the bottom that lists the actual jobs, but we’re
going to wait to make that in a second.
Post a Job
This is where Bruce Wayne finds employees. There’s a form that captures all
the job description data from someone like Bruce. Add a text header and then
an image to show the progress above the form.
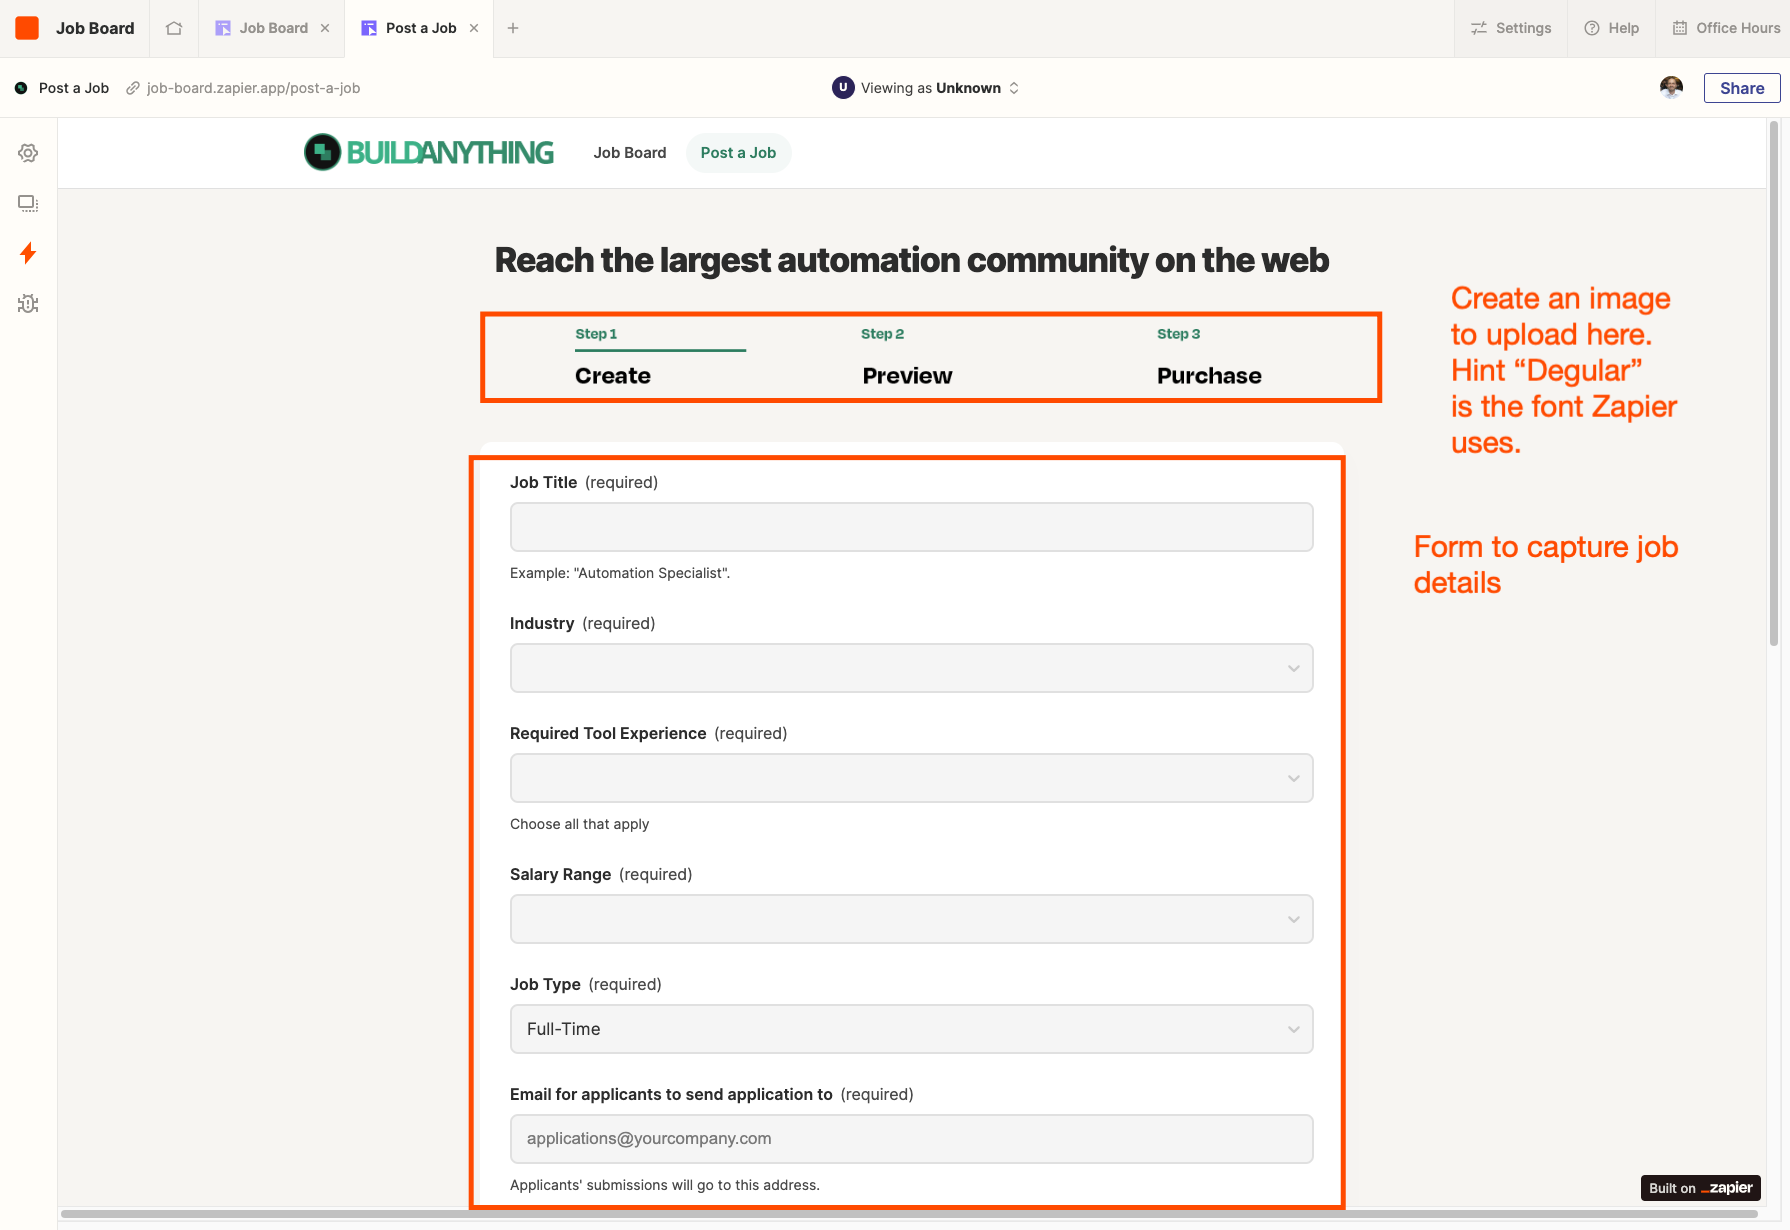
You could add any fields you want, but here’s the list of ones I added:
- Job Title
- Industry
- Required Tool Experience
- Salary Range
- Job Type (Full-time or Contract)
- Email for applicants to send application to (could also be a website to apply)
- Job Description
- Your Company Name
- Company HQ (location)
- Logo
- Company’s Website URL
- Your Email (to confirm purchase and send receipt)
- Company Description
- Fav Batmobile Color
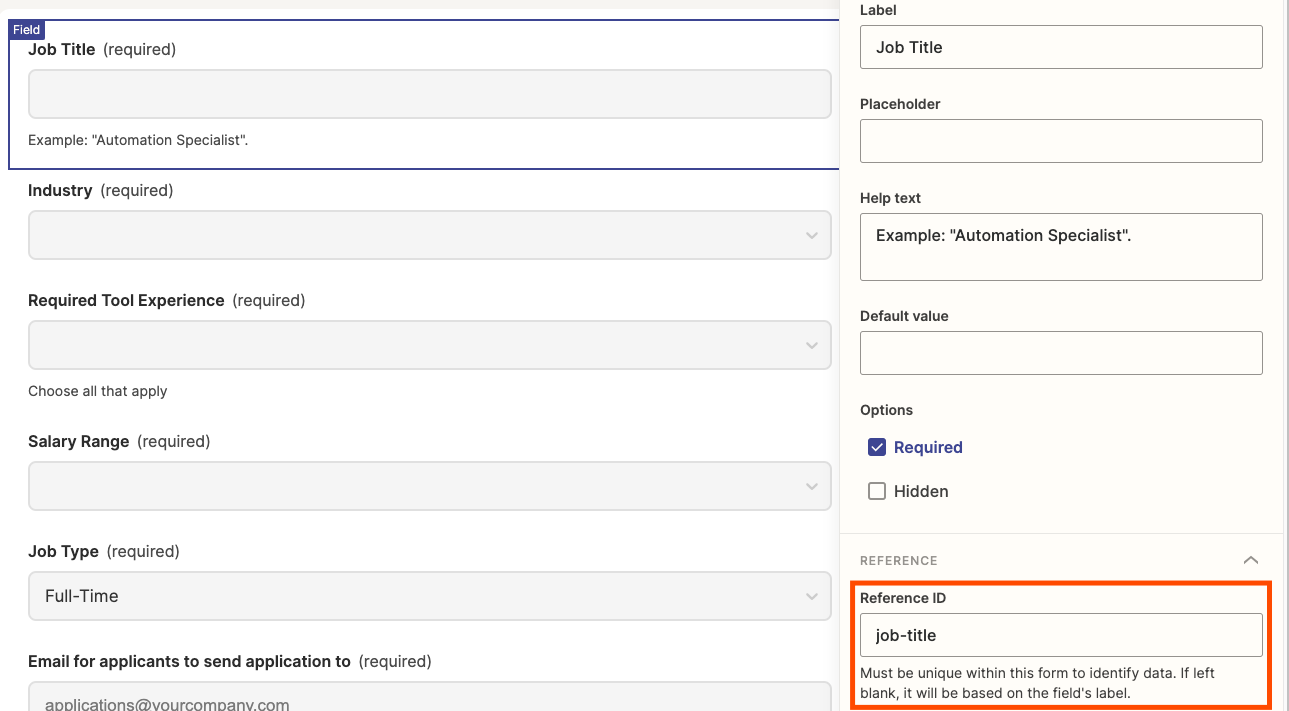
There is a really important step to get right with the form: Reference
IDs. Every field can be referred to by name. It’s like their Birth
Certificate.
Why is this important? Because we use these references to populate the Preview
and actual Job post.
When you create each field, update its Reference ID to something easy like
job-title for the “Job Title” field.
Once a company is done filling out the job post form, they’ll click the
“Continue to Preview” button. You’ll have this button navigate them to the
“Preview” page by adding it in the “Actions” tab of the form.
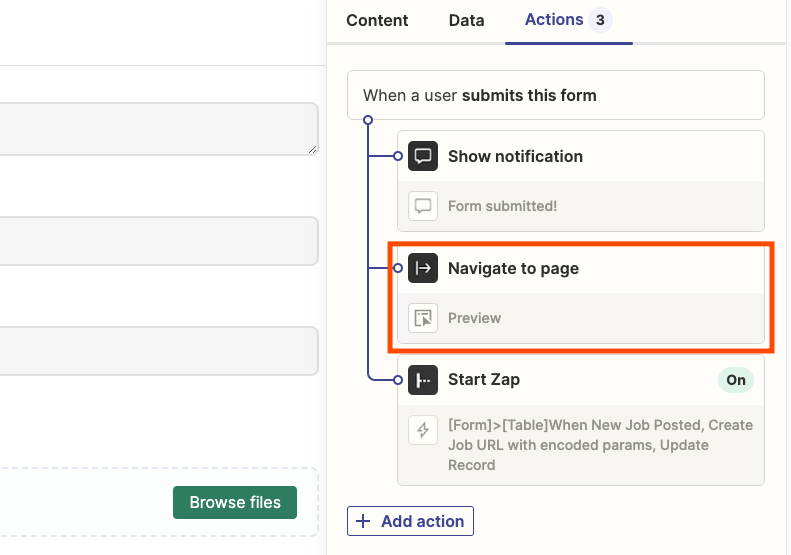
When you send someone to a page, you can also send the data (or form
information) to the page! This little trick is critical so that the Preview
page shows the Job information the company just filled out.
Preview and Job
The Preview and Job pages are almost identical. The Preview page shows the job
post for a company who’s ready to purchase and post. It has the progress image
at the top and a link at the bottom for them to purchase.
The Job page has only the job posting itself.
Be sure to create both.
Think of these pages like templates. The data is sent via the URL from the
form. To grab the data, you use a fancy looking placeholder that looks like
this:
The name is the Reference ID you filled out for each form field (hope you made
them easy to read!).
So, you’re constructing the Preview and Job post with these parameters from
the URL.
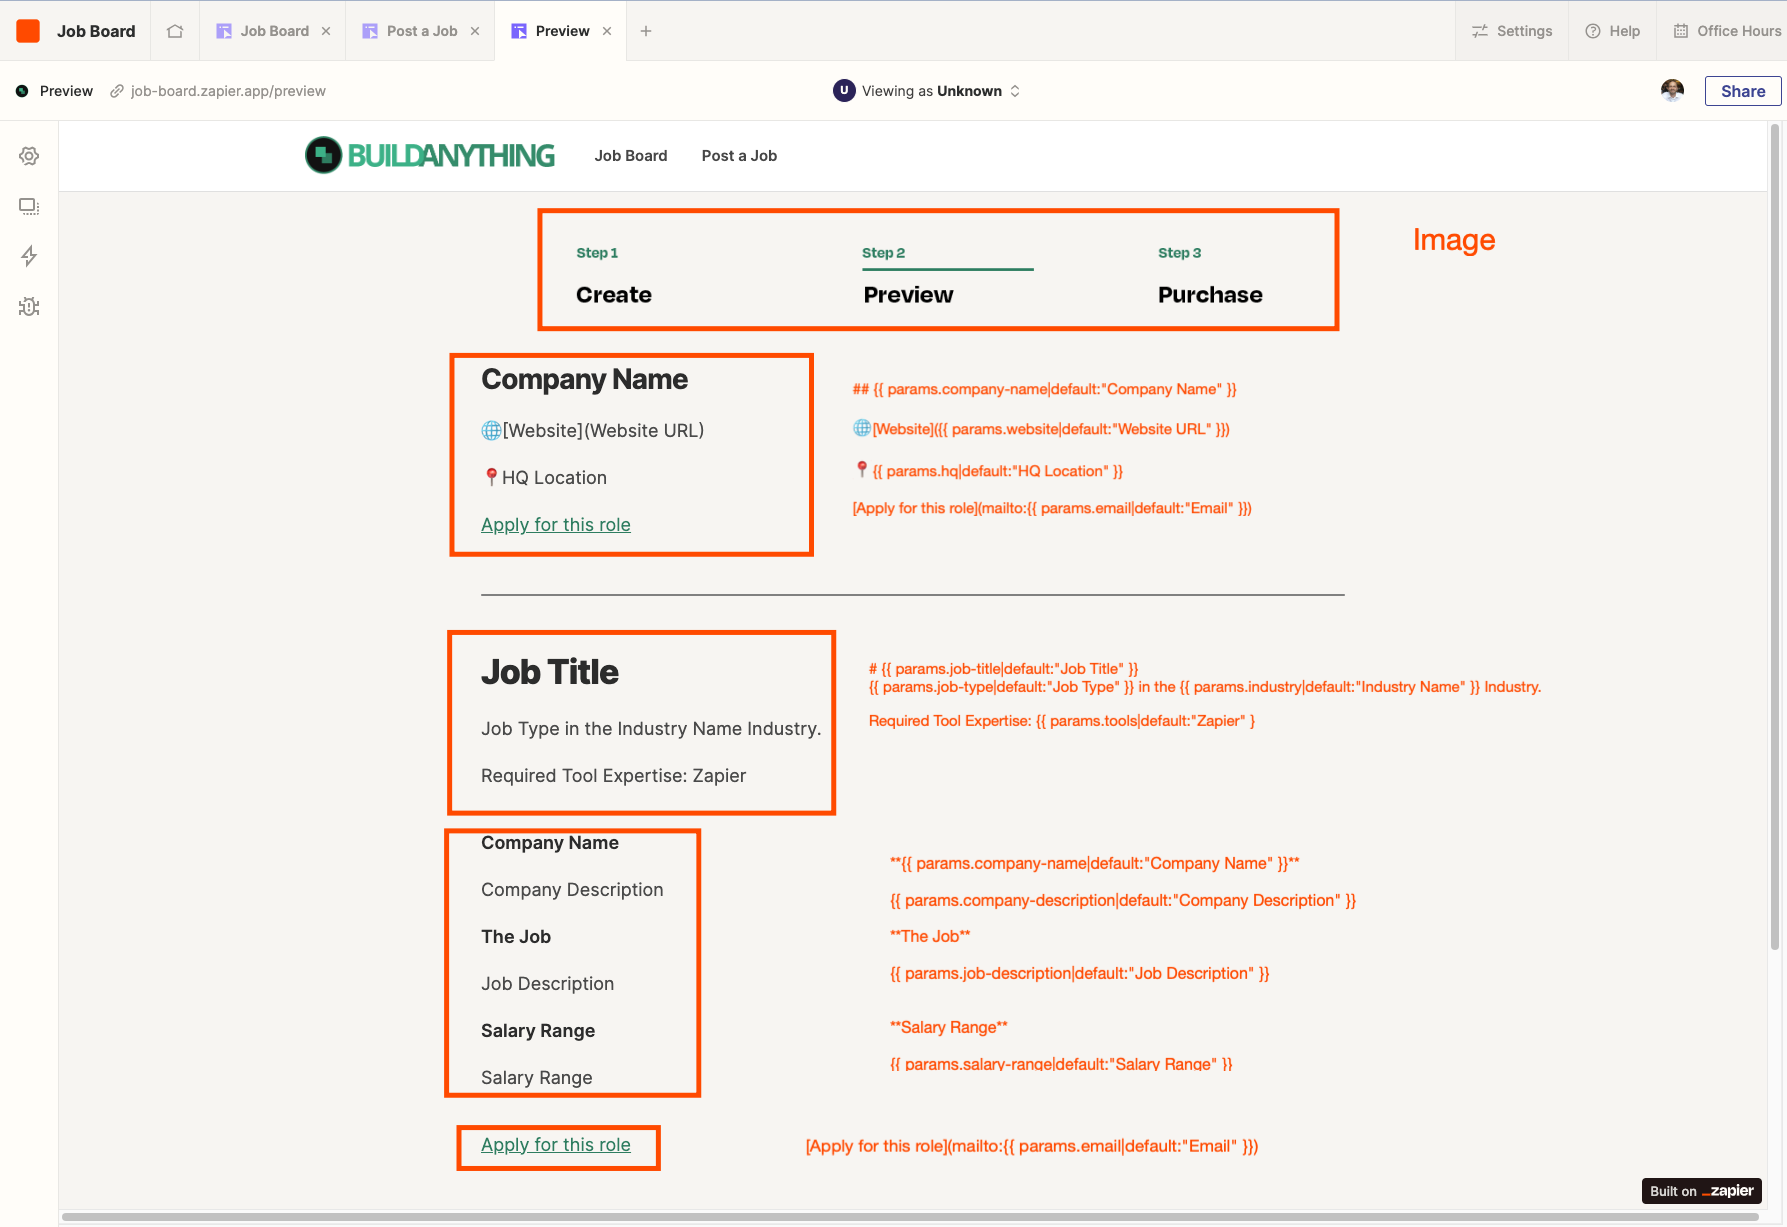
The remaining piece is to set the “Confirm and Purchase” link to navigate to
something like a Stripe or Gumroad Product page.
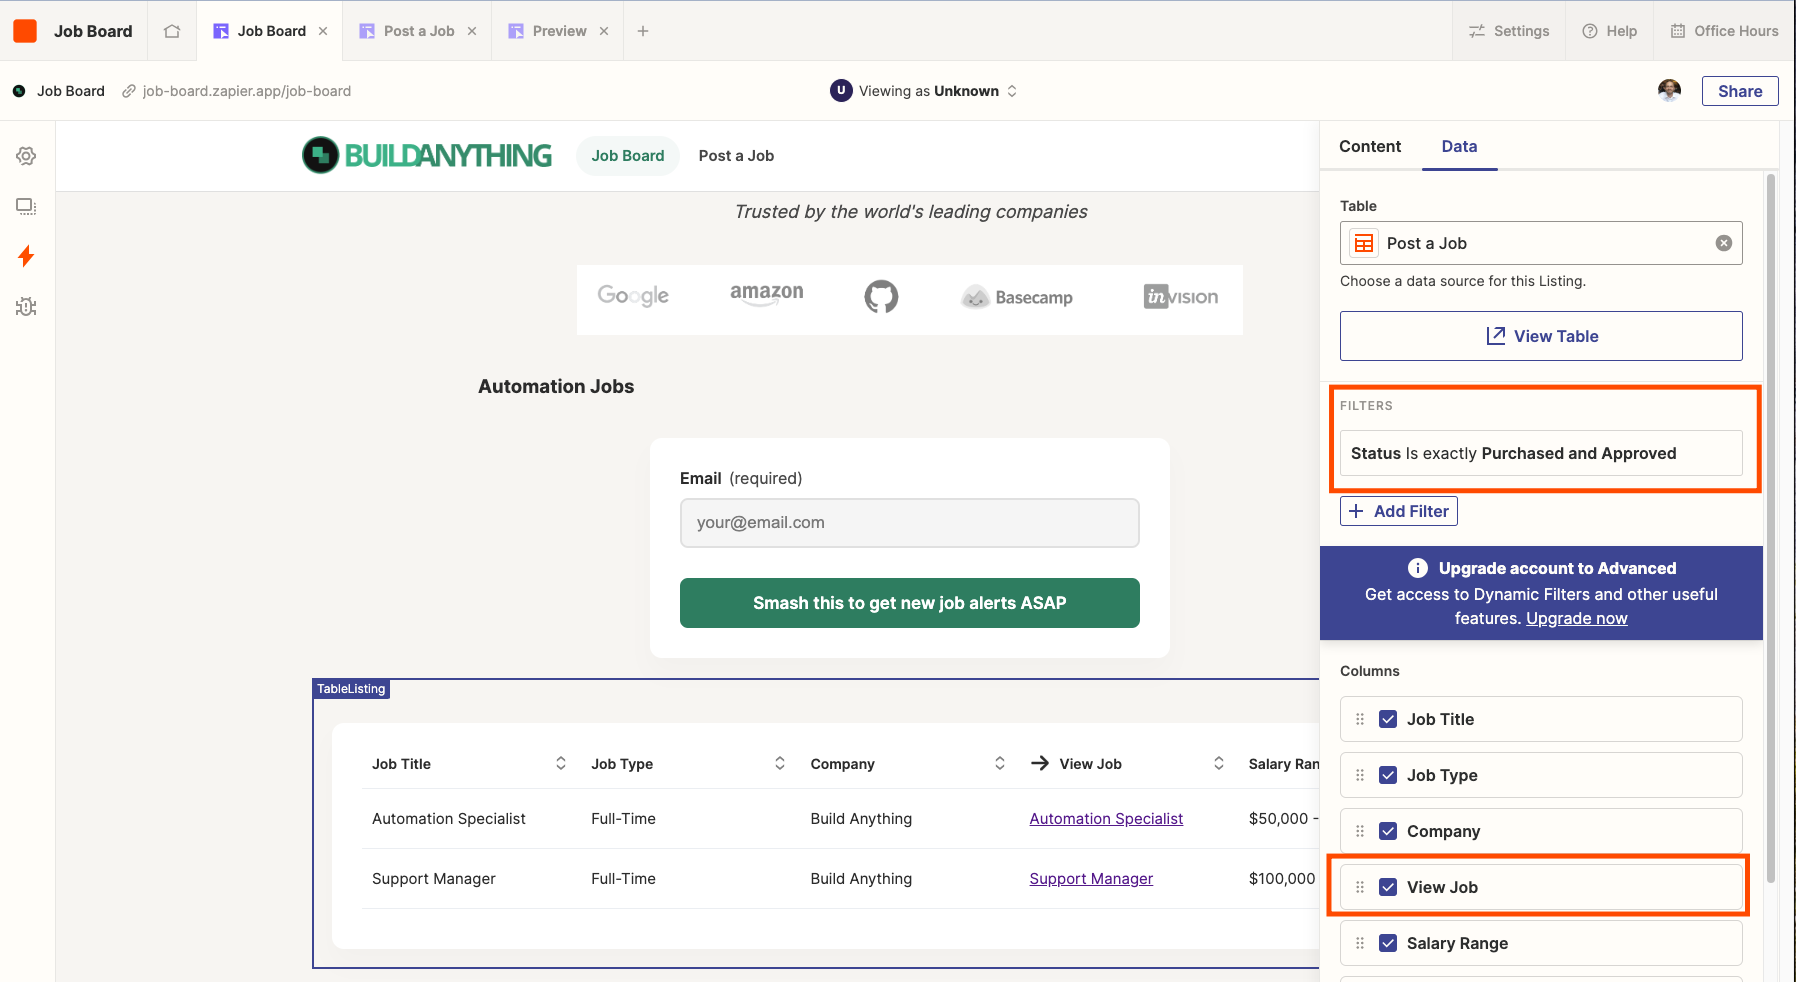
Add Field to Tables
Now that you have both the “Job-Seeker Subscriber” and “Post a Job” form set
up and Tables created, you’ll want to do a couple of things.
Navigate to your Job Post table.
First, add a Status field with “Pending, Purchased, and Purchased and
Approved” options and also a View Job URL field.
Then, back in the Job Board page of your Interface, add the Job Post Table at
the bottom and filter for only records that have the Status “Purchased and
Approved.” Hide some fields to make it simple but be sure to surface the “View
Job” URL field.
Now that we have the Tables and Interface built, we need to create the Zaps to
do some of the automating.
Create the Zaps (and AI)
There is only one critical Zap to get right. You need to build the Job Post
URL from all of the form fields using those Reference IDs we worked on
earlier.
To do this, you’ll Trigger on new submissions and then for each field, you’ll
need to use a Formatter > URL Encode step to make sure the data is read
properly OR use the following prompt in an OpenAI step:
I need to URL Encode the following fields with their values (please use +
instead of the space and join each separate field by &) and append them onto
the URL: [Insert your Job Post URL followed by a ? here]
So for job-title=Support Manager, the output would be [Insert your Job Post
URL]?job-title=Support+Manager
Here are all the fields:
job-title=
….
Just add in all of your fields and boom!
The last steps are to find the record in the Table, and then update the
record’s “View Job” URL field with the output from the OpenAI step.
Remaining Steps to Go Live
This Job Board is oh-so-close to working as is. But, there are a few other
things you’d actually want to do before embedding this on your website or
publishing as its own standalone website.
Product/Payment
Like I mentioned, you’ll need a Stripe or Gumroad page to actually complete a
purchase. You’d want to create a Zap that, when a new purchase is made, finds
the associated Job Post record in your table and updates the “Status” field to
“Purchased.” You could also have it notify you so that you can go into the
Table and approve the post if it looks good.
Job-Seeker Emails
If a Job-Seeker subscribes, you’ll need to capture their email address
somewhere. I recommend something like Mailchimp or ConvertKit. Once you have
their emails, you’ll create a Zap that, when you approve a new job post to go
live, will create an email campaign and send it out to your subscribers.
Find yourself a nice little niche and get this thing set up!
To recap:
- Build and Operate most of your Job Board all on Zapier :)
- You’ll need four Interface Pages using Reference ID’s and URL params to dynamically update, two Tables, and one critical Zap
- Just an additional Product/Payment page, Email provider, and a Zap or two to get this fully functioning
Happy Building,
Bryce
Let's Connect

Learn to build with Zapier
Subscribe to the Build Anything Newsletter.
